Cutting a mango perfectly isn’t always easy. Neat cubes, elegant slices, and perfect scoops make for the best addition, but they require a bit of time and technique. With a few tips, you’ll learn how to dice, chop, and cut a mango with ease.
Why Cutting a Mango Can Be Tricky
Cutting a mango perfectly can be tricky sometimes because of two important things: the central pit and the flesh that can slip if you rush. Thanks to its complex texture, the mango fruit is soft enough to bruise easily, yet firm enough to hold its shape when you get the blade angle right.
Before you start cutting, it’s important to decide on the desired shape. For instance, mango slices work perfectly for fruit platters and mango smoothies , whereas mango cubes are great for charcuterie boards and mango salad bowls .
Here’s a closer look:
| Cut Type | Best For | Pros | Cons |
|---|---|---|---|
| Cube | Salads, bowls, crostini, charcuterie boards | Uniform pieces; easy to eat | Requires precise scoring to avoid pits |
| Slice | Fruit platters, garnishes, smoothies | Fast; elegant presentation | Can slip if not stabilized |
| Chop | Salsas, sauces, or chunky toppings | Coarse texture; versatile | Requires careful control near skin |
Tools You’ll Need to Cut a Mango
To cut your mango perfectly, start by deciding on the shape. Next, collect your tools and utensils. You might need a:
- chef’s knife (about 8-10 inches long)
- cutting board (non-slip preferred)
- Teaspoon or spoon for scooping
- Paper towels for cleanup and grip
- Ripe mango
How to Cut a Mango Step-by-Step
Here’s a guide on how to cut mango fruit and a few tips to help you perfect your approach. The steps assume a standard mango about 3-4 inches in diameter and roughly 8-10 ounces in weight.
| Step | What to Do | Why It Helps |
| 1 | Hold the mango upright on the cutting board and locate the flat sides around the pit. | Finding the pit helps you waste less flesh and guides clean cuts. |
| 2 | Cut from top to bottom along each side of the pit to make two halves. | Two clean halves give you stable work surfaces for slicing or scoring. |
| 3 | Choose a cutting style (hedgehog, strips, or scooped flesh) based on your goal. | Different styles suit bowls, garnishes, or smoothies—speed matters. |
| 4 | Score the flesh without cutting through the skin, then flip or scoop as needed. | Scores make cubes; flipping yields neat results; scooping is fastest for purees. |
| 5 | Remove the mango pieces and pat dry if needed. | Dry flesh sticks less to utensils and looks better on a board. |
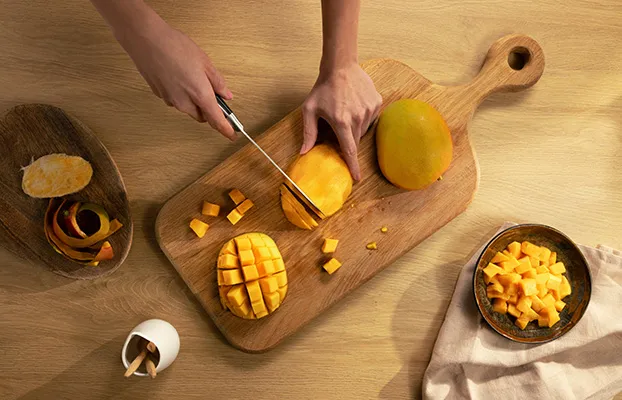
Method 1 – How to Cut Mango Cubes Using the Hedgehog Style
Start by cutting the mango into two even halves and removing the pit. Next, score the flesh in a tight crosspatch pattern, being careful not to cut through the skin. After scoring, flip the skin outward and press gently to create a hedge-like surface. Finally, use a knife or spoon to detach the cubes cleanly from the skin.
This method tends to produce uniform cubes that sit nicely as mango bite-sized appetizers on charcuterie boards or even in salads. Here’s a quick summary of the method:
- Place the mango on its flat edge and cut down along each side of the pit.
- Score the flesh in a grid pattern, stopping at the skin.
- Invert the skin to pop out the cubes.
- Slide or scoop the cubes away from the skin.
Method 2 – How to Slice a Mango into Strips
To slice a mango into strips, place the mango halves skin-side down and slice along the length to create long, thin strips. Ensure to keep the knife steady and let the blade ride along the curve of the fruit to avoid cutting through the skin.
That’s it! You now have strips that are ideal for salads, mango pokes , fruit stacks, and decorative garnishes on a charcuterie board. With a little practice, you might even be able to produce restaurant-worthy ribbons.
Here’s a quick summary of how to slice a mango into strips:
- Cut along the length of each mango side, keeping the knife as parallel to the skin as possible.
- Trim away any remaining flesh near the center and edges to form clean strips.
- Arrange your mango strips flatly for quick serving or layer on a board for variety.
- Use strips for wraps or toppings if you prefer a lighter presentation.
Method 3 – How to Chop a Mango
If you’re wondering how to chop mangos for smoothies or purees, start by cutting two halves away from the pit. Then, slide a spoon between the flesh and skin to scoop out large chunks.
Here’s a quick overview of how to chop a mango:
- Cut around the pit to free each mango half.
- Slide the spoon between the flesh and skin and scoop out the chunks.
- Repeat on the other half and transfer the pieces to a container.
- Chill briefly if you’re not blending right away to reduce browning.
How to Store and Serve Mango After Cutting
Storing cut mango properly helps preserve color and flavor. You can refrigerate chopped mango pieces for up to two to three days if you still want to enjoy the same quality and freshness. If you want to freeze your mango pieces and preserve freshness for longer, start by freezing them on a sheet pan before transferring the pieces to a freezer bag, where you can store your mango for up to three months.
If you plan on storing your mango pieces for quick smoothies, freeze your mango into smaller, ready-to-use batches and blend directly from the freezer.
Common Mistakes When Cutting Mango
Some of the most common mistakes that people make when cutting mango fruit include:
- Using a dull knife that slips easily.
- Cutting too close to the pit or slicing into it.
- Using too much pressure and crushing the flesh.
- Rushing the scoring step, which leaves ragged edges.
- Peeling the mango before cutting, which wastes edible flesh.
Mango in Charcuterie
Mango brings brightness to appetizers and charcuterie boards and pairs beautifully with creamy cheese, salty meats, and roasted nuts. You can add mango cubes to a board or have a few strips that are neatly arranged in bows for an extra wow factor.
If you’re creating a modern board, balance the sweetness with sharp cheeses like aged cheddar or tangy feta with crunchy nuts like almonds or pistachios. If you’re aiming for a visually appealing spread, incorporate more color with different types of fruits and vegetables.
Frequently Asked Questions about Mango Cutting
- What is the easiest way to cut a mango?
The best way to cut a mango is to cut along the two flat sides of the pit and then score the flesh. Next, flip the skin and pop out the cubes. A small, sharp knife should do the trick, and a non-slip board will come in handy.
- Do you peel a mango before or after cutting the mango?
Peeling a mango is optional, and it depends on what you’re aiming for. If you’d like neat cubes or strips, you can peel your mango after cutting it to avoid waste, but this method might be time-consuming and not ideal when you’re in a rush.
- How do you know when a mango is ripe enough to cut?
A ripe mango gives slightly to gentle pressure, smells fruity near the stem, and shows vibrant color in many varieties. If it’s too firm, it may need a few days at room temperature; if it’s overly soft or mushy, it’s past peak for best texture. Ripe mangoes cut more cleanly and taste sweeter, which tends to improve any dish or board.
- Can I use a splitter to cut a mango instead of a knife?
A mango splitter can help position the fruit and remove the pit quickly, which can be convenient for beginners or when you’re cutting many mangoes at once. You’ll still need a knife to trim the flesh from the skin or to cut into the shapes you want. The splitter doesn’t replace a sharp knife for precise cuts or delicate presentation. If you’re prepping in bulk, a splitter can be worth it; for perfect control and presentation, a good knife remains essential.
- What’s the best way to cut a mango for smoothies?
For smoothies, scooping, peeling, or roughly chopping the mango into chunks works well, especially when you’re aiming for quick blending. You can also cut the mango into large chunks and freeze them on a sheet, then bag them in ready-to-blend portions to minimize prep in the morning.
Final Tips for How to Cut Mangoes Like A Pro
Slicing a mango perfectly might not be the easiest thing, but with practice, you’ll be able to do it in no time. Remember to use a sharp knife, stabilize your cutting surface, and work slowly enough to maintain shape and texture. With some patience, you’ll be able to yield the best presentation and flavor.


